Quarantine log day 137: Antumbra CARA has breathed new life into the settlement. While the children cannot find much use for it’s beautifully random CV and gate, they do enjoy basking in the glow of the light up 3.5mm jacks on a late fall evening. We’ve eaten all the factory built modules on the racks, and I’m not sure if that’s pink noise through a VCA, or if one of our settler’s has come down with something of a cough. We’ll throw him out back with the Doepfer modules come sunrise.
Just kidding, Doepfer is dope. More like Dopefer.
Sorry, here’s what you came for. The Antumbra CARA build.
Forgot about the whole taking pictures thing... but I remembered eventually! Bonus points if you recognize the Spotifiy tunes.
My brain clicked in about 2/3rds of the way through this build. As soon as I realized I wasn’t documenting, I grabbed my camera and took a picture of it all sitting on the corner of my desk, waiting patiently for my actual work day to end.
I’m clean and messy, OK? It’s a thing.
This little brain board is dying for a scrub.
As with any Antumbra build, say, ATOM, things went smooth. Good quality stuff, as always. There is one of those cute little 4 pin crystals on this board, check out my KNIT build to see how you can tackle that without re-flow equipment.
Soldered, flashed, and ready for hardware!
The process for flashing CARA is quite simple, it uses the same JTAG interface used to flash many of the Mutable Instruments builds. You can see one of my other builds for some extra insight into this process.
Where things get a little slippery is the calibration process. As always, huge ups to our man forestcaver, who just crushes it 24/7.
First, you have to measure the voltages coming out of the module. This is tricky to start with, as standard portable multimeters, like mine, are not precise enough to properly calibrate this module. A multimeter with a count of above 50,000 is recommended to get the CV properly tuned on this lil’ pup.
Second, you have to modify the code for the module, recompile, and re-flash.
Just when you thought you were done...And yes, I wear purple mesh shorts. ON THE REGULAR.
Essentially, you will measure the output CV from various points on the module and record them. You can do this using a standard TS cable from each output, and measure the other end of the cable with your multimeter. Once you have recorded the values, you will “generate” the code necessary to flash the module. Something like this:
Where the red xxx will be your values generated from Antumbra’s calculator or forestcaver’s spreadsheet. You can paste these over the values found in the settings.cc file in the Marbles build folder. Save it. (I used VI editor within the mutable environment, but nothing is stopping you from navigating to the vagrant folder and modifying the code on your Host OS).
Recompile (i.e. make -f marbles/makefile) . Reupload. Calibrate ADC. Enjoy
If you don’t know what I’m talking about, how did you read this far down? Good on ya.
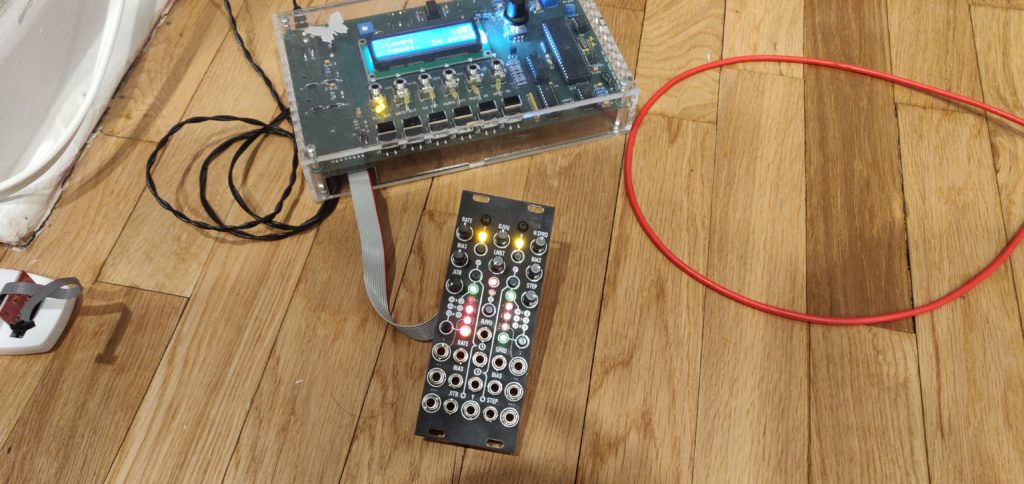
Flashed, calibrated, and ready for the big times!..Sort of
And finally, all done!…ish. Sadly, I do not have the space for a desktop multimeter. I am moving into a new space come July, and I will finally have a dedicated workbench! Not a workbench/studio/office desk/gaming station.
So what does this mean? It means my CV is a little off. It will not send voltages as precise as I would like, or as precise as necessary to have this on anyone’s rack but my own. Come July (or sooner if I get impatient) I can finally calibrate these CARA’s into perfect tune!
And even without being completely calibrated…this module is amazing. I won’t get into it here, because it is essentially 5 modules crammed into one. You’ve got Grids, Branches, a new fun drum gate mode, 3 super controllable CV outs, a constantly changing “Y” CV out, and we haven’t even got into it’s signal processing capabilities or Turing Machine-like functionality. WILD.
And that’s it that’s all! Antumbra CARA, done! Stay tuned folks. Teletype, some more fun 16n stuff, and maybe even video content, all in the near future!
[ finally got round to doing the build. Can you explain the process from when you’ve finished soldering. I’ve read so much about wav files, jtags and measuring voltages I’m confused 😕
Following along with the “Usage” section after setting up the DEV environment will get you where you need to be. Sadly, the .WAV method won’t work until you’ve flashed a bootloader at least on to the chip. So, you will need to follow the above to get it working.
Here is another link to a post I made on ModWiggler, where I copied someone else’s guide with some of my own notes. Hopefully this will help too!


on the bom it says you need a 54 pin header, where does that go?
I think the BOM is assuming you would break that header into the smaller pieces you would need for the build. Let me know if that helps!
[ finally got round to doing the build. Can you explain the process from when you’ve finished soldering. I’ve read so much about wav files, jtags and measuring voltages I’m confused 😕
Hey JT congrats on completing the build! I won’t be able to explain it fully here, but you can follow some of the instructions here:
https://github.com/pichenettes/mutable-dev-environment
Following along with the “Usage” section after setting up the DEV environment will get you where you need to be. Sadly, the .WAV method won’t work until you’ve flashed a bootloader at least on to the chip. So, you will need to follow the above to get it working.
Here is another link to a post I made on ModWiggler, where I copied someone else’s guide with some of my own notes. Hopefully this will help too!
https://modwiggler.com/forum/viewtopic.php?p=3459703&sid=b4143665ad2a5d9b1add691d3ec08077#p3459703