Yep, that’s right. I’m back on my bullspit, doing a part 1.5 build diary-and-a-half. Sorry folks, this Deckard’s Dream has been a slow go, and I think part 2 will be a ways off. I guess I could just make this a Part 2, but would that really be true to my style? Absolutely not. So let’s get slippy.
Motherboard COMPLETE
That’s right! The motherboard is finally good to go. Feeling good about it, the joints are solid like a Canadian Cannabis shop, and I’ve got continuity where I need it, and loads of resistance where I don’t!
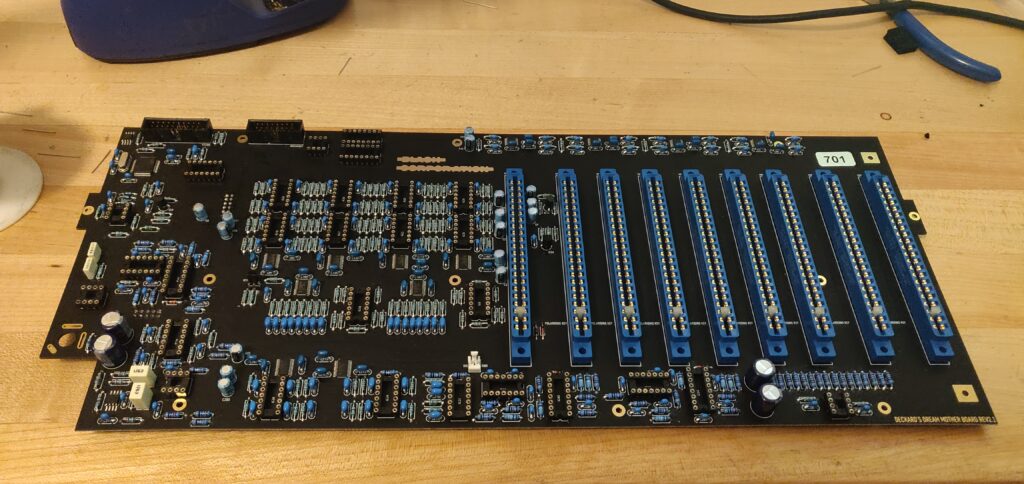
I even got the little plastic polarizing caps, because I’m scared of my own clumsiness! If I slapped one of those voice boards in backwards, or goodness forbid the PSU board, I’d have to hibernate in bed until 2021. I think I might do that anyway looking at the current state of the world. BUT HEY WE’RE TALKING DIY, NOT RONIES.
The last portions of the motherboard weren’t too trippy. Had to keep a close eye on the direction of the electrolytic caps, but other than that it was just a straight solder slog on through to the very end. The 44 pin edge connectors I used weren’t from eBay as the BOM recommends, but these guys here. They slotted in nice and are looking pretty on the motherboard, so thumbs up there!
While we’re on the subject, I grabbed these polarizing caps. They didn’t drop in flush with these connectors, but they fit nice and snug and they do not prevent the card from sitting all the way into the connectors. Double thumbs up!
Getting that PSU Board Ready
After the motherboard was complete, I wanted to get the PSU board complete so I could check my power rails and ensure everything is just as good as it looks on the motherboard.
So I got to soldering. And low and behold, I forgot a very key component. Let’s see if you can spot it my distinguished young reader.
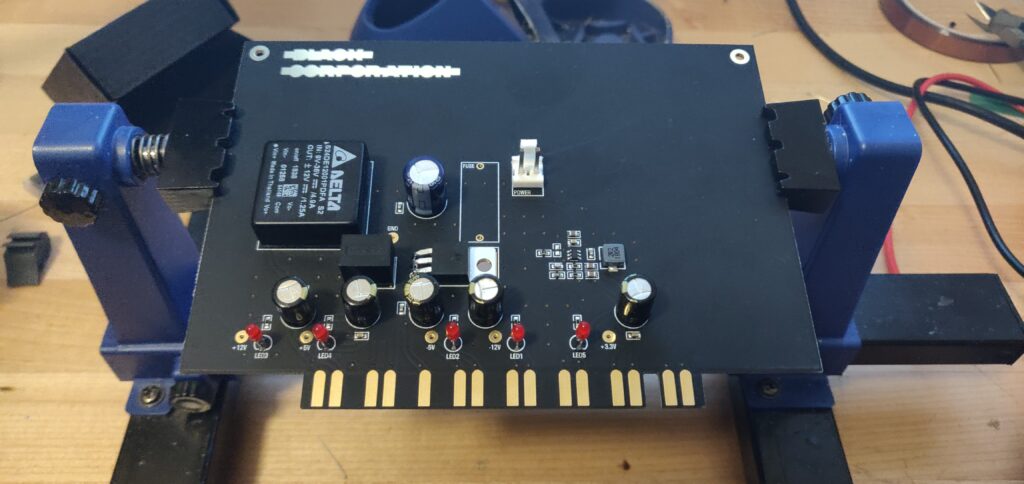
Yep, went and forgot the fuse. Well, I didn’t exactly forget it, but I did purchase only two of the necessary components.

Oopsies! Sure, I could slap some wires on this bad boy, but when you’re putting a Deckard’s Dream together, well, you don’t slap wires anywhere. Unless…you know, the build calls for that. So until my fuse holder arrives, we’re gonna leave that PSU board incomplete! Don’t worry. LOTS of soldering still to go, so I’ll be bladerunnin’ before you know it!
So, What's Next?
Well, as far as what is next for this build, I’m going to finish up this blog and start soldering this little cutie.

And after that it will be time to start on the voice boards, oh my! Very exciting times folks, very exciting times.
So with all that being said, I think you won’t see a Deckard’s Dream build diary for a few weeks now. A lot of what comes next is the same thing over and over again, and while I will be documenting it, I won’t have much to say on it until they are all complete.
The good news is, once all those puppies are done, we’re getting close to the end! Hopefully there won’t be too much troubleshooting to do, but I’m ready for anything to get sizzlin’ on a CS-80 clone. 8 Voice Boards, polish off the PSU board, bang out the output board and the hardware board, and BAM, we’re synthin’!…
…OK saying that out loud (or typing, WHATEVER READER) makes it seem like there is a bit more to go before the light at the end of the sci-fi soundscape smeared tunnel, but that’s OK! We knew this was going to be a slog, dear reader. And I’m sorry I got upset with you up near the top of this paragraph, I’ll try to be better, I promise.
Thanks for coming around, as always. The Deckard’s Dream has really been soaking up my time as of late, but I promise the Typhoon build is coming soon, as well as the LoFi-Nator pedal I’ve been sitting on. That will be a project for this week. Maybe one day I’ll take a swing at that SWN too… One day! So many projects so little time. If only there was a delay module for real life! Am I right folks?
Sorry. Have a great week and keep it samesies out there.
Also, check out some of my old builds if you’re feeling sassy! Like that Advanced Yarn’s build, or it’s little brother the mBrane! That was also a pile of fun. Maybe if you’re jonesin’ for more Deckard’s you can check Part 1 of this series. Lot’s of good stuff! BUH-BYE.
Hey there! Can I ask what solder you use for your surface mount work? Leaded or unleaded? Thickness? Thanks!
Hey there! Thanks for reading!
I use leaded solder, no need to conform to RoHS when it’s just for me. It is just so much easier to work with.
Specifically, I use Kester 245 No-Clean, thickness/diameter 0.031 for all my joints. SMD and through-hole. I find it perfect for both.
Some prefer to use an organic flux based solder for most joints and then clean with warm water, then no clean for hardware (pots switches etc…). I prefer just to use no-clean for all my joints. There is no disadvantage electronically, but it does leave a little residue behind. I end up cleaning this away with iso alcohol and kimwipes anyways, so it ends up looking about the same too.
Any other questions let me know!
Did you finish this thing? just powered mine up last week… it’s a… Dream.
Hey Kris! Sorry for my late reply… the blog has suffered lately due to some personal circumstances. But it will be back and better than ever soon.
That being said, i’ve got 7 of the 8 voices complete, 5 of them installed and singin’. Right now I’m waiting on some parts for the final voice, but even with the 5 voice cards… the thing is absolutely incredible. I’ve been so impressed. Hahaha it is absolutely a dream, I’ve been running it through a ZOIA I just picked up and playing it with my fancy new Linnstrument… the MPE just makes it come alive. So amazing. I’ll be posting the final blog for this guy in the next few weeks hopefully. Same with the Lyra-8, finally got the enclosure sorted. Hope all is well on your end of town, stay tuned!!